
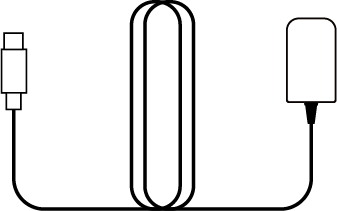
*Power adapter not included in all kit packages

English
GrowHub E42A+ Manual
Model Name
-
GrowHub E42A+
Safety Information
Please read these instructions carefully before using the device. Failure to follow the safety guidelines may cause serious injury, void your warranty, and release Vivosun from all liability.
-
Ensure your AC power source meets the electrical requirements of this device.
-
Check and comply with local laws and safety regulations for installation and operation.
-
Follow the instructions for each smart device and connect only compatible devices to the controller using the appropriate cables.
-
DO NOT connect incompatible devices.
-
DO NOT use this controller or any connected grow devices outdoors or in hazardous environments, including areas with flammable/explosive materials, corrosive chemicals, or excessive moisture. These devices are designed for indoor use in grow tents only.
-
DO NOT cover power cables with rugs or fabrics.
-
Turning off devices via the controller does not fully disconnect power. Always unplug and power down all devices before installation, maintenance, or relocation.
-
Carefully read and follow the instructions for each device and its connection to the controller. Failure to do so may result in damage and void the warranty.
-
If any device or power cord is damaged, stop use immediately and contact Vivosun. Do not disassemble or modify devices without Vivosun’s authorization—doing so may cause damage and void your warranty.
Key Features
|
|
-
COMPLETE HUB : Monitor and control SGS devices such as grow lights, circulation fans and duct fans, no need for multiple controllers.
-
SIMPLE TO USE : Interactive color display with 6 touch buttons, designed for growers of all levels.
-
WI-FI & APP CONTROL : Wi-Fi enabled for remote monitoring and control via the Vivosun App
-
EASY INSTALLATION : Innovative magnetic mount for quick, flexible installation anywhere.
-
DUAL SENSORS : Dual temperature and humidity (RH) sensors track conditions inside and outside your grow space while displaying VPD.
-
SMART & PROFESSIONAL : Smart auto mode and professional grow recipe settings support plants from seed to harvest with minimal user input required.
Product Contents
| Image | Name | Quantity |
|---|---|---|
|
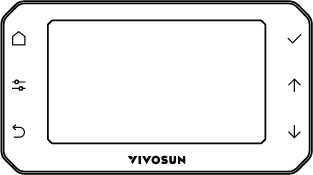
Smart Controller |
1PC |
|
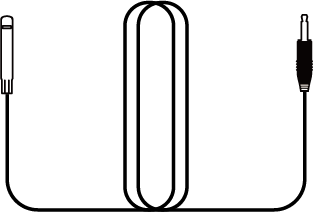
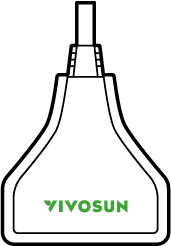
Temperature/ Humidity Sensor (3m) |
1PC |
|
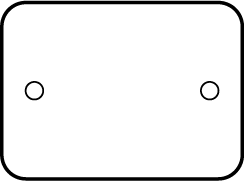
Iron Plate |
1PC |
|
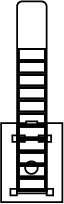
Converter (Type C to RJ11 & RJ45) |
1 PC |
|
Wire Tie |
1 PC |
|
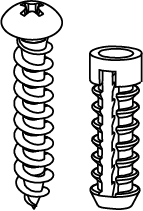
Expansion Screws |
2 PCS |
|
Cable Tie |
3 PCS |
|
12V Adapter* |
1 PC |
Specifications
Display Size: |
4.3" Color Screen |
Rated Power: |
3 W |
Wi-Fi Connection: |
2.4 GHz |
Operating Voltage: |
12 V |
Operating Humidity: |
35%–85% RH |
Operating Temperatures: |
32–140°F (0–60°C) |
Dimension: |
5.55*3.18*0.79 in (14.1*8.1*2 cm) |
Sensor Probe Length: |
9.84 ft (3 m) |
Installation & Connection
TENT MOUNTING
Remove the tape cover from the Iron Plate and stick it to the INSIDE of your tent where you want the controller positioned. Then place the GrowHub Controller on the OUTSIDE of the tent—it will attach securely to the Iron Plate using the built-in magnet on its back.
|
|
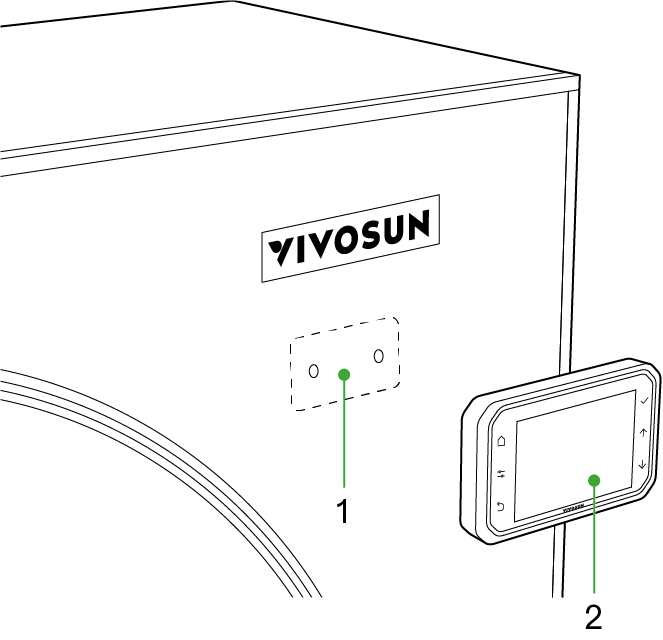
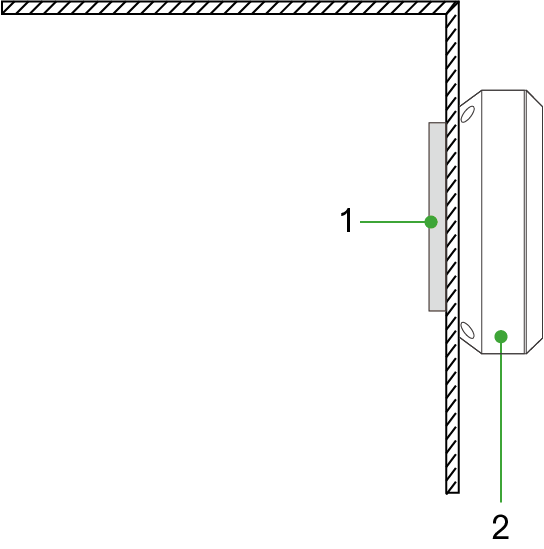
*1.Iron Plate
*2.GrowHub Controller
WALL MOUNTING
|
|
Mounting Holes |
Slotted Hanging Holes |
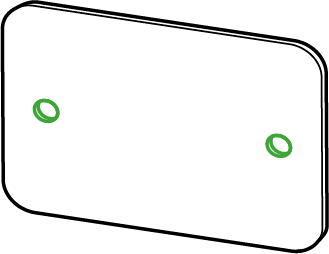
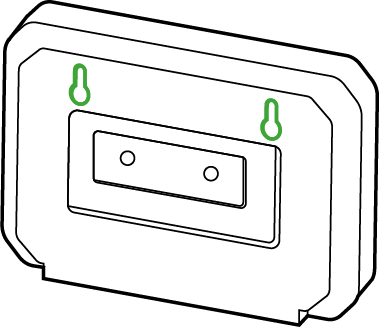
This installation method requires drilling holes at the desired mounting location. First, measure the distance between the Mounting Holes on the Iron Plate and mark these points on the mounting surface. Drill the holes, insert the plastic expansion anchors, align the Iron Plate with the holes, and secure it in place using the provided screws. The GrowHub Controller can then be mounted directly onto the Iron Plate using its built-in magnet.
Alternatively, you can hang the GrowHub Controller directly on the screws without the Iron Plate. Measure and mark a center distance of 74mm, drill holes, and insert the expansion screws. Then, align the Slotted Hanging Holes on the back of the GrowHub Controller with the screws and slide it into place.
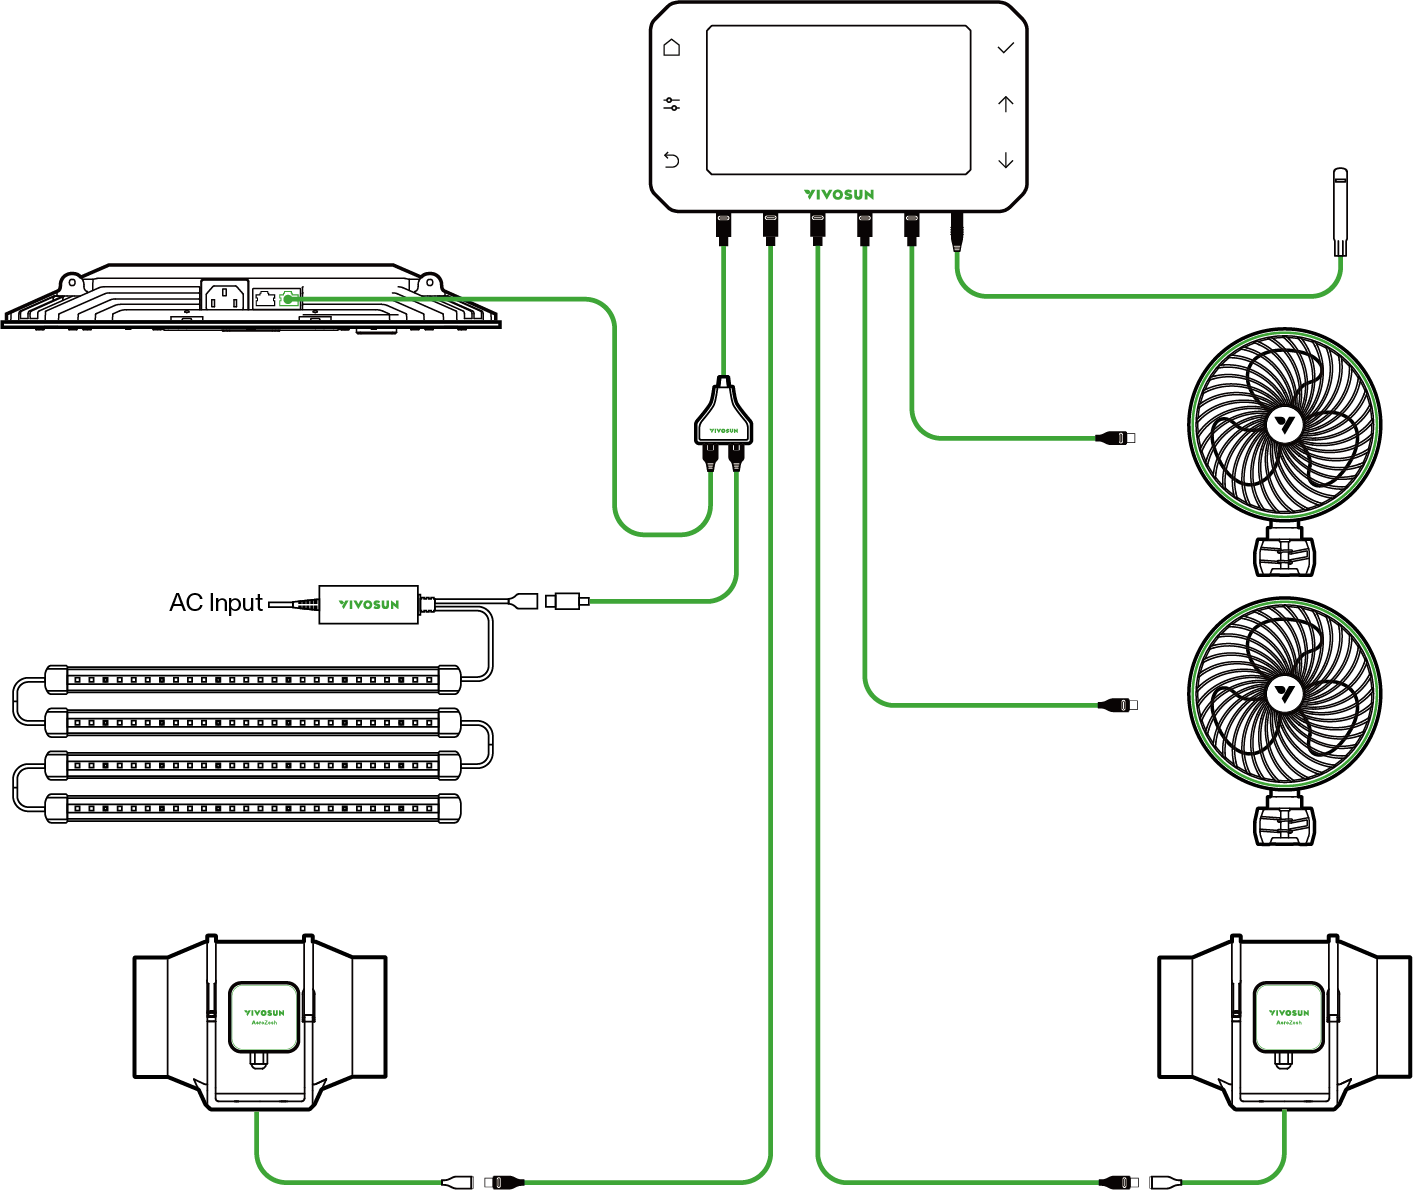
I/O

Light |
Light Type C Port: Use Type C to RJ11 & RJ45 converter to control AeroLight, LumaLight and LumaRay |
A/B/C/D/E |
Universal Type-C Ports: Power Adapter, AeroWave Clip-on Fan, and AeroZesh Inline Fan |
|
2.5mm AUX Interface: Temperature & Humidity Sensor |

CONFIGURATION OVERVIEW
COMPATIBILITY LIST
List of Compatible Light by Brand
| Brand: Models | Port on GrowHub E42/E42A/E42A+ |
|---|---|
BESTVA: Bat, TF Series |
RJ11 port(E) |
FLEXSTAR: PRO, SE, MATRIX, TRIFOLD, NOVA Series, LTL630W |
RJ11 port(E) |
GROWER’S CHOICE: ROI Series, TSL-800 |
RJ11 port(E) |
HYPHOTONFLUX: HPF, PRO Series |
RJ11 port(E) |
MARS HYDRO: TS, FC, FC-E, SP Series |
RJ11 port(E) |
LUXX: 200, 645, 860 Series, DE100(HPS) |
RJ11 port(E) |
MEDIC GROW: EZ, FOLD, MINI SUN Series |
RJ11 port(E) |
PHLIZON: PL, FD, PRO Series |
RJ11 port(E) |
SPIDER FARMER: G, SE, SF Series |
RJ11 port(E) |
SUNRAISE: Bar Series |
RJ11 port(E) |
VIPARSPECTRA: KS5000(2023), XS2000(2023), PRO Series(2023) |
RJ11 port(E) |
VIVOSUN: Aerolight Series |
RJ45 port(F) |
VIVOSUN: VS(Except VS1000E), VSF, VSFD, VSFL Series, VSX3200 |
RJ11 port(E) |
VOLT: VL Series |
RJ11 port(E) |
List of Compatible Inline Fans by Brand
| Brand: Models | Port on GrowHub E42/E42A/E42A+ |
|---|---|
AC Infinity: Cloudline A, B, S, T Series with Type-C connector |
Type C Ports(A/B) |
AC Infinity: Cloudline Series with Molex connector |
Type C Ports(A/B) with Fan adaptor |
VIVOSUN: AeroZesh Series |
Type C Ports(A/B) |
VIVOSUN: Other Inline Fans with AUX Connector |
Type C Ports(A/B) with Fan adaptor |
Attention! Some light models may only support a limited number of daisy-chained lights and have a limited dimming range so these lights may not function as you expect. We recommend contacting your light’s manufacturer for more information.
VIVOSUN will continuously update our products to ensure lights and fans are compatible with the VIVOSUN SGS.
All BRANDS listed above are registered trademarks of their respective companies. VIVOSUN does not claim any affiliation with these brands.
Operation
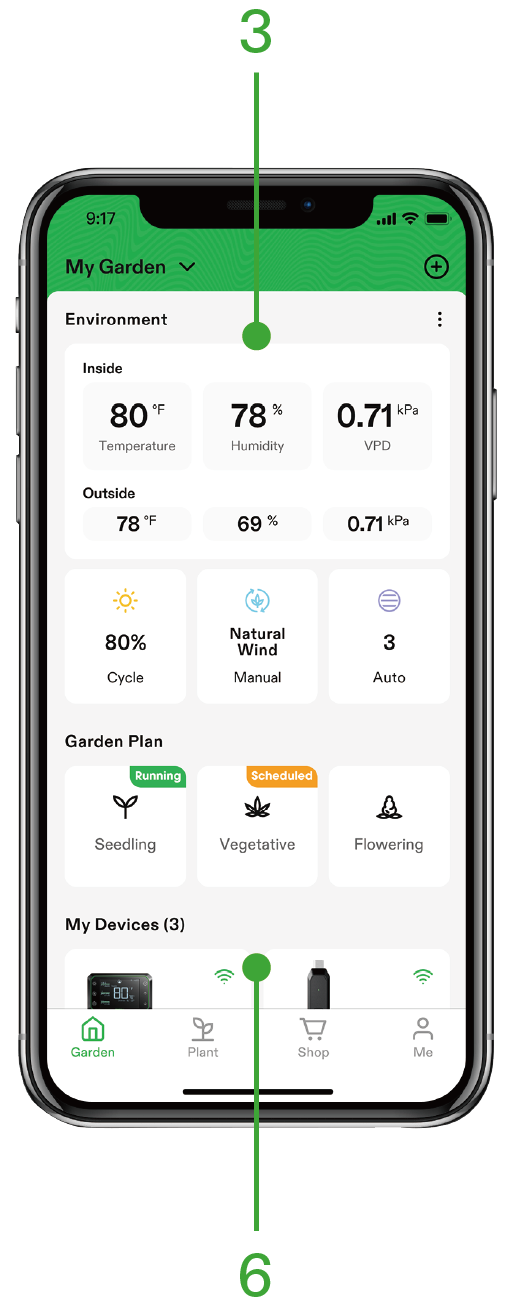
For maximum convenience, we recommend connecting your GrowHub Controller E42A+ to the Vivosun App. This lets you monitor and control your grow environment from anywhere using your smartphone—whether you’re relaxing at home or traveling abroad. The app also unlocks additional features and functions to enhance your growing experience.
CONNECTING TO THE VIVOSUN APP
1. Download the Vivosun App
Search ''VIVOSUN'' in the Apple App Store or in the Google Play Store to download the Vivosun app.

2. Add your GrowHub Controller E42A+
Tap '' + '' or  to add your GrowHub Controller E42A+. When connecting to the Vivosun app,
  will flash on the screen.
Note: Make sure you have a 2.4 GHz Wi-Fi connection, and that Bluetooth is enabled on your phone.
LOCAL OPERATION
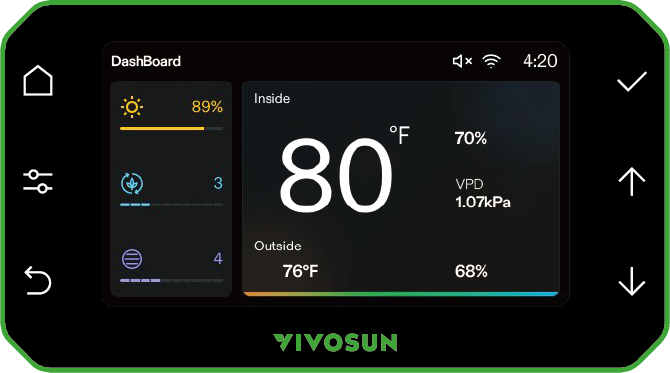
| Button | Short Press | Long Press |
|---|---|---|
|
Go to the Dashboard |
|
|
1. Enter the Control page on the Dashboard 2. Cycle between different devices on the Control page 3. Cycle between different tabs on the Settings page |
Enter the Settings page |
|
1.Return to the Dashboard when in the Control/Settings page 2.Discard current settings and return to the previous page |
|
|
1. Confirm selection 2. Confirm current settings |
Exit Recipe Mode |
|
Increase the current setting value |
1.Toggle °F/°C on the Dashboard 2.Continuously increase value when configuring parameters |
|
Decrease the current setting value |
Continuously decrease value when configuring parameters |

FIRST-TIME SETUP
First, connect the GrowHub Controller E42A+ to a powered Vivosun device such as AeroLight, AeroZesh duct fan, AeroWave clip-on fan, or a power adapter to turn on the Controller. The GrowHub Controller E42A+ draws power directly from these devices.
Next, set the system time by using the  and
and  buttons and pressing
  to confirm. The system
time will automatically sync with your local time once connected to Wi-Fi.
to confirm. The system
time will automatically sync with your local time once connected to Wi-Fi.
After setting the time, select the device type (Power Adapter, AeroWave Clip-on Fan, AeroWave Gen2 Clip-on Fan, or AeroZesh Inline Fan) for each port you’ve connected. You must configure all ports after the initial setup.
Port settings can later be adjusted under Settings > Port.
Note: All ports assigned the same device type will operate under the same logic. For example, if Ports A, B, and C are set as AeroWave clip-on fans, they will all follow the circulation fan logic.
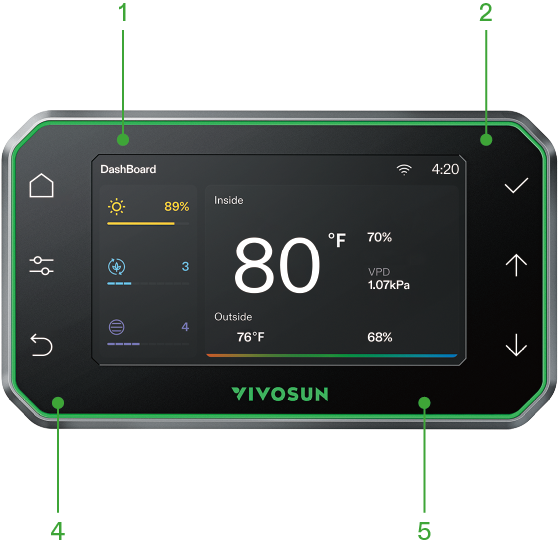
GROWHUB INTERFACE
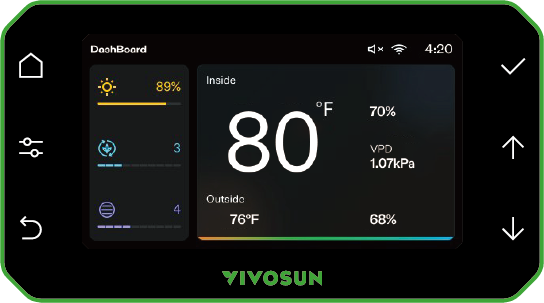
Dashboard:
Press  to access the Dashboard. Here, you can view the status of your devices and monitor all environmental parameters.
-
System settings: time, Wi-Fi, key tone
-
Current operating status of connected devices
-
Inside temperature, humidity and VPD
-
Outside temperature and humidity
-
Alerts for high/low temperature, humidity, VPD.
Control:
On the Dashboard , press  to enter the Control page to set up a grow light, circulation fan or
duct fan. You can press
on the Control page to switch to the device you need. Press ↑ ↓ and to set and confirm.
to enter the Control page to set up a grow light, circulation fan or
duct fan. You can press
on the Control page to switch to the device you need. Press ↑ ↓ and to set and confirm.
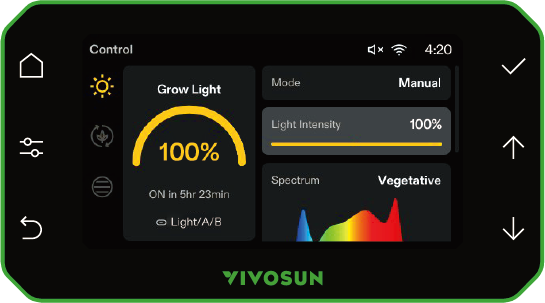
Grow Light:
-
Current operating status of the grow light
-
Mode selection: Manual or Cycle
-
Light intensity setting: 0–100%
-
Spectrum selection: Seedling, Vegetative, Flowering
-
Start time, ON duration, OFF duration, Sunrise/Sunset (Cycle mode only)
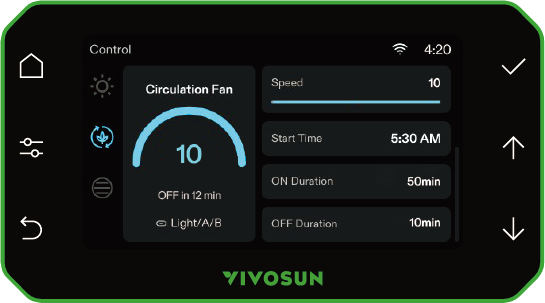
Circulation Fan:
-
Current operating status of the circulation fan
-
Mode selection: Manual or Cycle
-
Speed setting: OFF–10
-
Natural Wind setting: ON / OFF
-
Start time, ON duration, OFF duration (Cycle mode only)
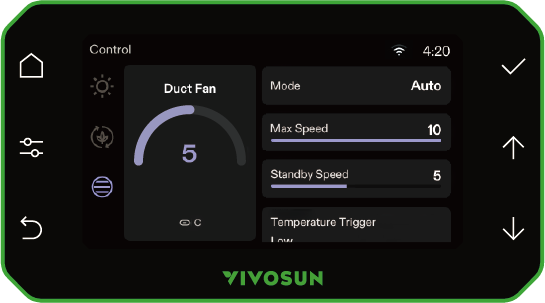
Duct Fan:
-
Current operating status of the duct fan
-
Mode selection: Manual, Cycle or Auto
-
Speed setting (OFF–10) in Manual and Cycle modes
-
Start time, ON duration, and OFF duration (Cycle mode only)
-
Max speed (1–10), standby speed (OFF–Max Speed, cannot exceed Max Speed), temperature trigger (High ≥ Low), humidity trigger (High ≥ Low), and VPD trigger (High ≥ Low) in Auto mode.
Settings
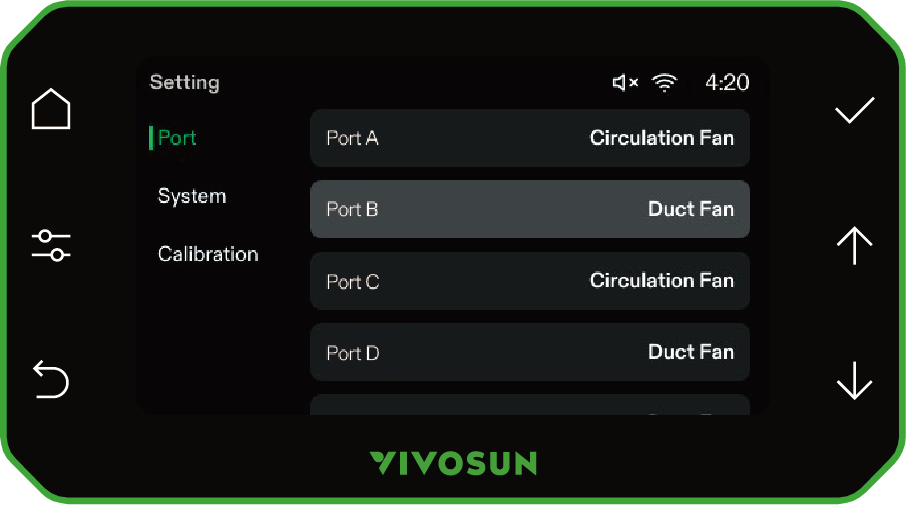
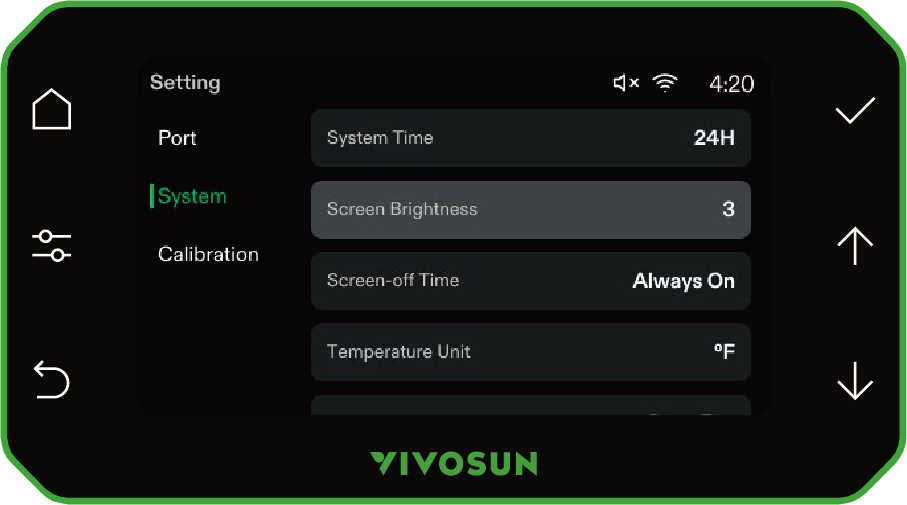
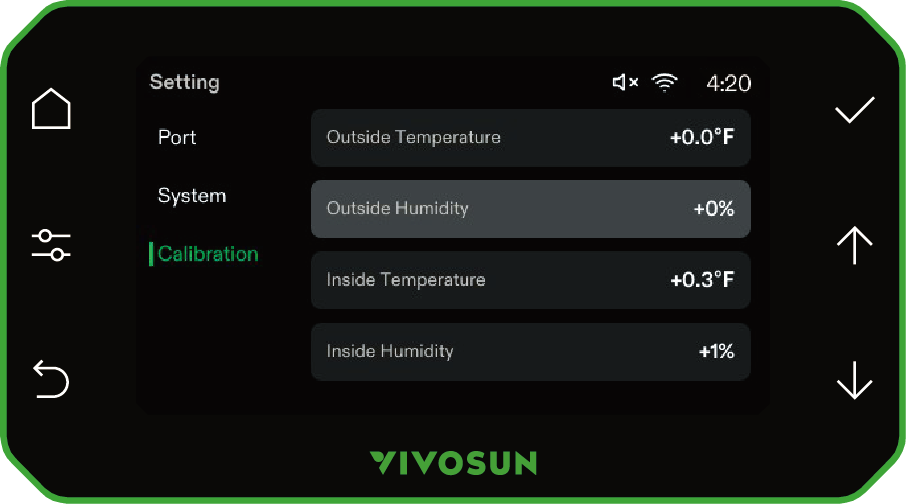
On the Dashboard/Control page, long press to enter the Settings page to set up Ports, System or Calibration. You can press on the Settings page to cycle through different tabs.
Press ↑ ↓ and to set and confirm.
Port
-
Assign device types to Ports A–E
System
-
System Time
-
Time Format: 12H / 24H
-
Temperature Unit: °F / °C
-
Key Tone: ON / OFF
-
Screen Brightness: 5–100%
-
Screen-Off Time: 30 sec / 1 min / 3 min / 5 min / Always On
-
Language: English / Deutsch)
-
Reset Device
Calibration
-
Inside Temperature
-
Inside Humidity
-
Outside Temperature
-
Outside Humidity
AUTO MODE
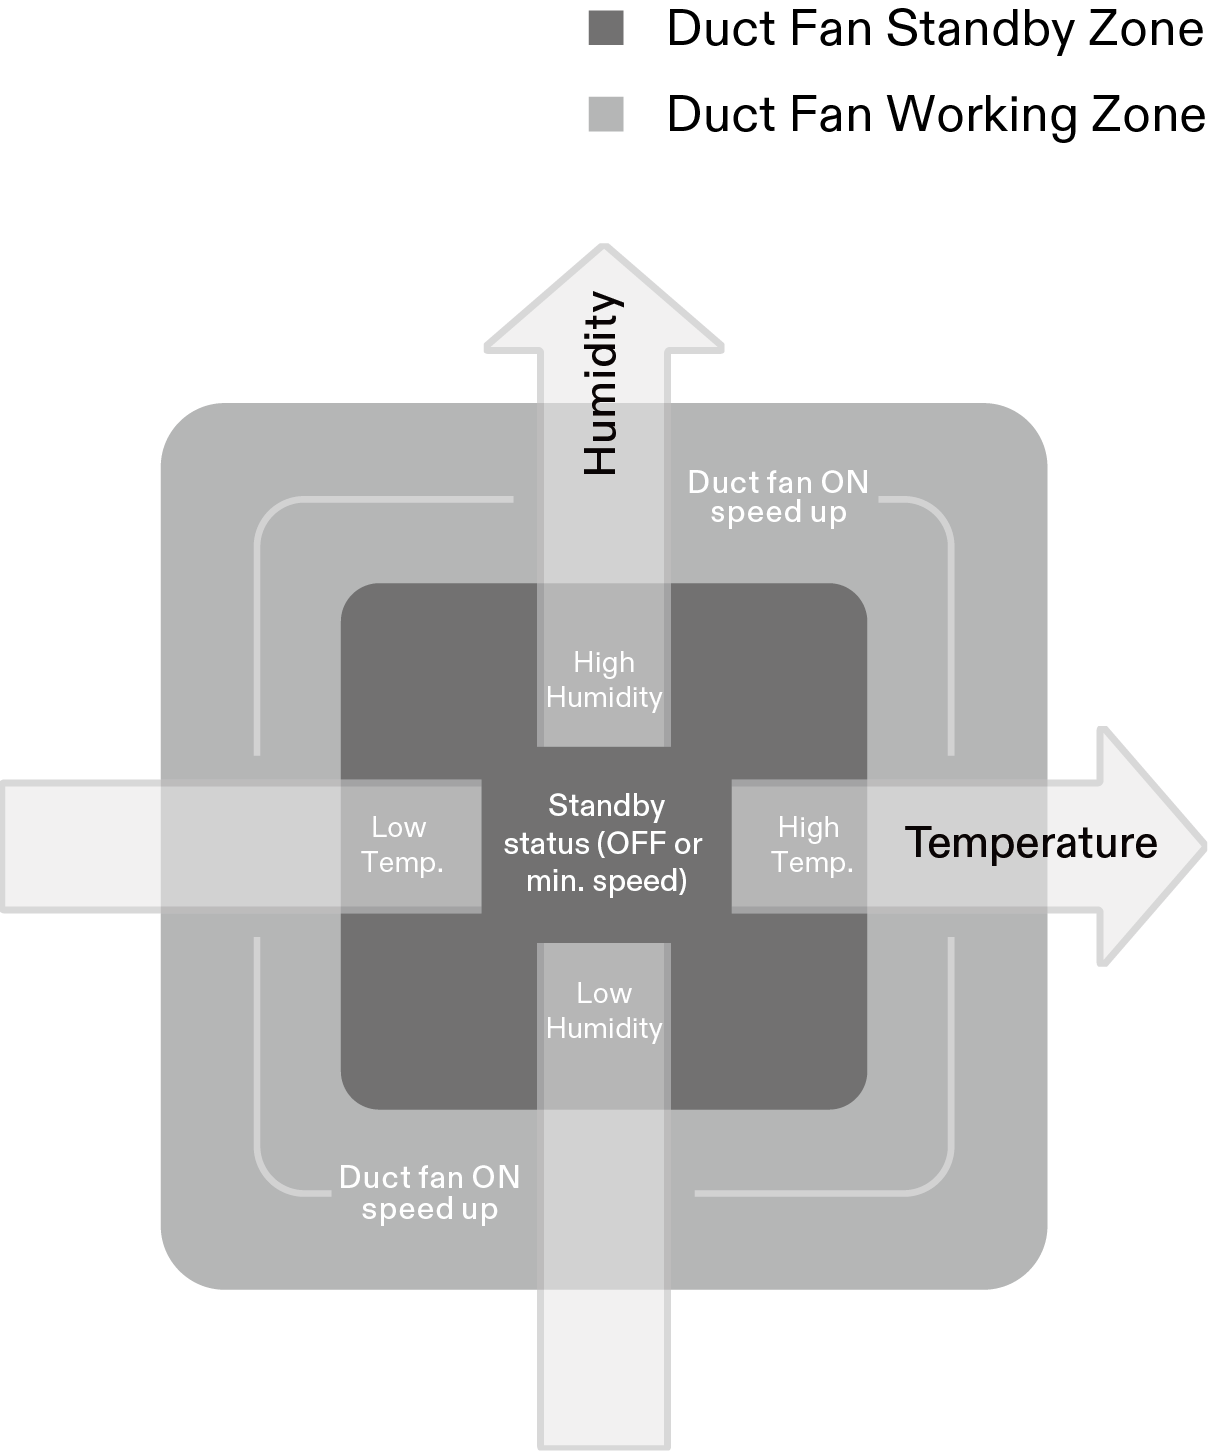
Settings for the thresholds between the duct fan’s standby and active zones can be adjusted using the GrowHub Controller or the Vivosun App. In the Vivosun App, you can also set the duct fan’s behavior during standby mode, choosing either to keep it OFF or run it at a minimum speed. When temperature or humidity reaches a specified threshold, the duct fan will turn ON or increase its speed.
The further the environment deviates from the threshold, the higher the fan speed will become.
The inside temperature or humidity reading will flash if the values rise above or drop below the set levels.
The alarm icon  will flash if the inside temperature or humidity exceeds the set range or if the duct fan remains in working mode for more than 1 hour.
AUTO MODE —TEMPERATURE EXAMPLE

Standby status
(OFF or min. speed)

Duct fan ON / speed up
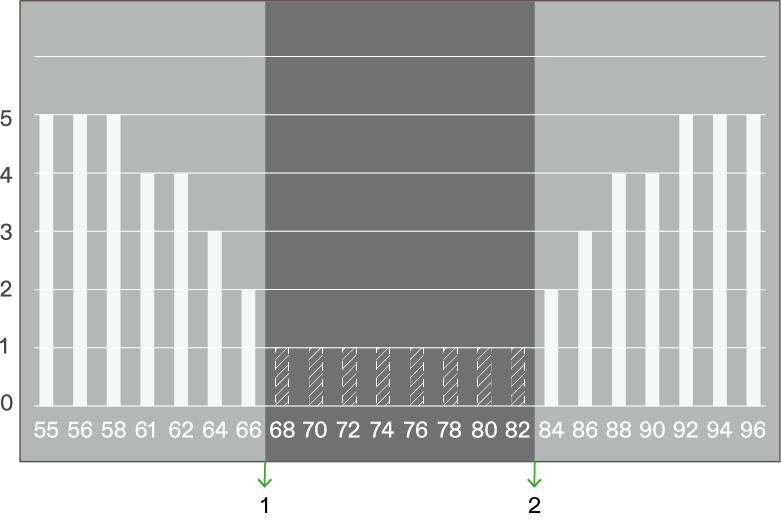
*The horizontal axis represents Temperature (°F)
① Low Temp.Trigger
② High Temp.Trigger
The example above shows the duct fan operating in Auto Mode (Max Speed = 5, Standby Speed = 1) in response to changes in inside temperature. When the temperature reaches a set threshold, the duct fan will turn on or increase its speed. The further the temperature exceeds the threshold, the higher the fan speed will become.
AUTO MODE—HUMIDITY EXAMPLE
Standby status
(OFF or min. speed)
Duct fan ON / speed up
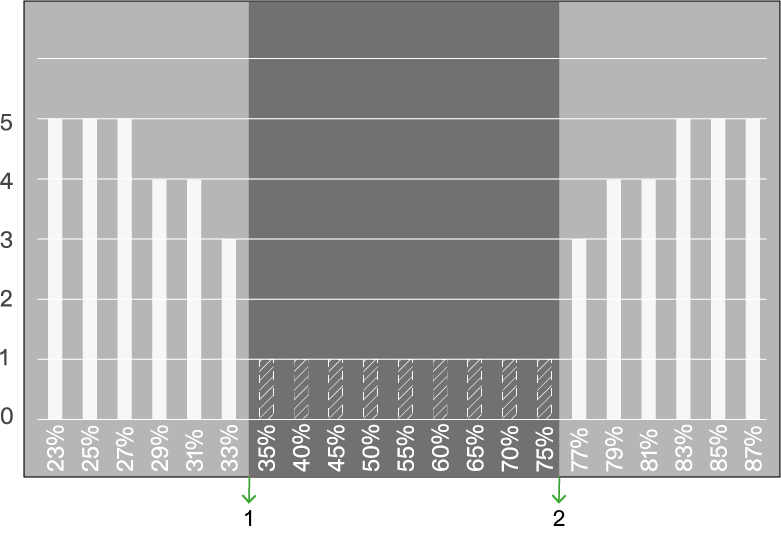
*The horizontal axis represents Humidity (RH)
① Low RH Trigger
② High RH Trigger
The example above shows the duct fan operating in Auto Mode (Max Speed = 5, Standby Speed = 1) in response to changes in inside humidity. When the humidity reaches a set threshold, the duct fan will turn on or increase its speed. The further the humidity exceeds the threshold, the higher the fan speed will become.
AUTO MODE—VPD EXAMPLE
Standby status
(OFF or min. speed)
Duct fan ON / speed up
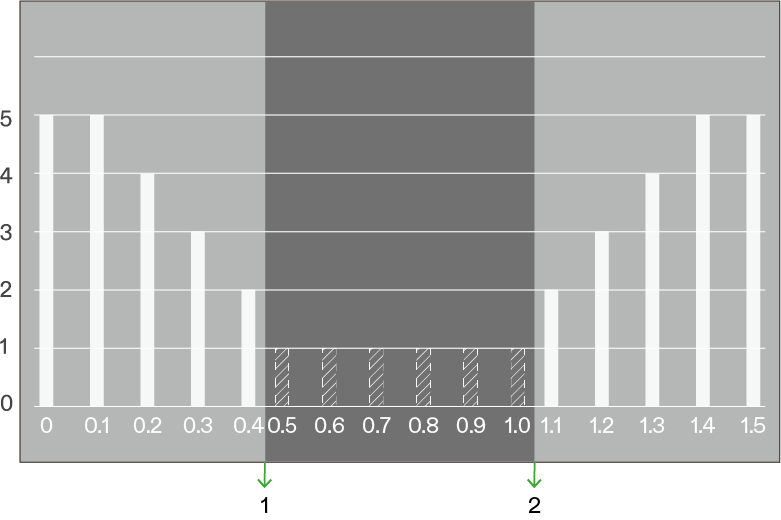
*The horizontal axis represents VPD (kPa)
① Low VPD Trigger
② High VPD Trigger
The example above shows the duct fan operating in Auto Mode (High VPD = 1.0, Low VPD =0.5, Max Speed = 5, Standby Speed = 1) in response to changes in inside temperature. When the temperature reaches a set threshold, the duct fan will turn on or increase its speed. The further the temperature exceeds the threshold, the higher the fan speed will become.
Note: For precise VPD control, use HVAC devices (AeroLush Air Conditioner, AeroStream Humidifier, AeroDrain Dehumidifier, AeroFlux Heater) together with the system. The duct fan alone can only help regulate VPD by exchanging air between the grow tent and the external environment to adjust temperature and humidity.
ADVANCED AUTO MODE
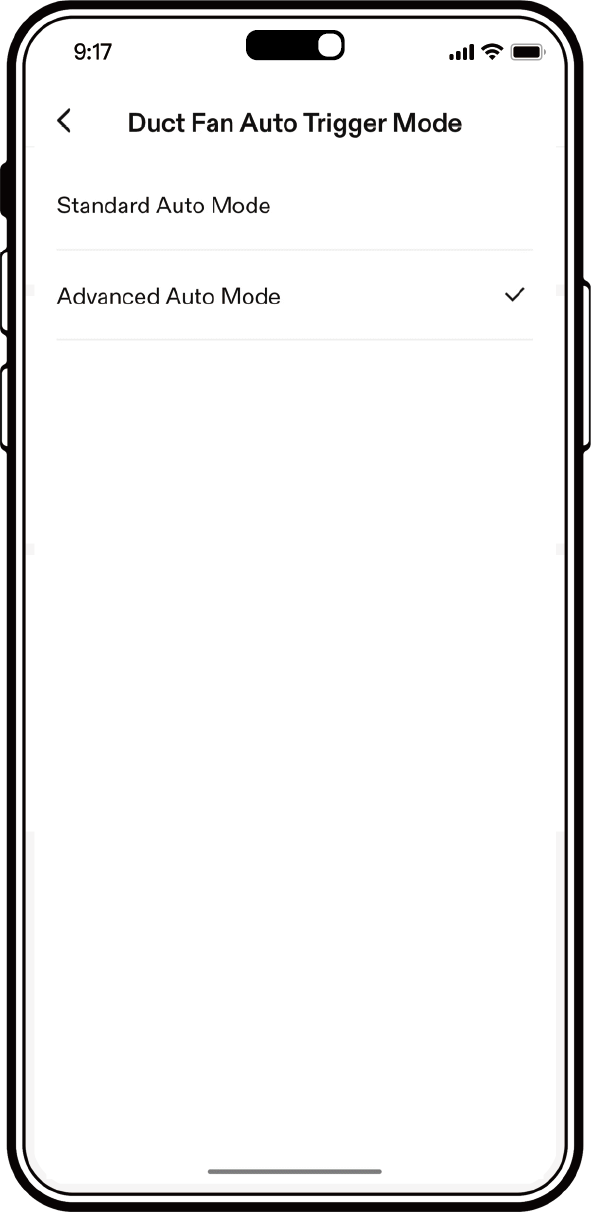
Use the Vivosun app to switch the duct fan to Advanced Auto Mode, where the system also considers the temperature and humidity outside your grow space when controlling the fan. In this mode, you can set minimum and maximum temperature and humidity thresholds. If the outside conditions are worse than inside, the duct fan will not increase speed—even if the internal temperature or humidity exceeds your set range. The alarm icon will flash to notify you that the external environment is unsuitable.
To enable Advanced Auto Mode, go to the Vivosun app: Settings > Additional Settings > Duct Fan Auto Trigger Mode.
FAQs
Q: Can I use the GrowHub controller without connecting to Wi-Fi or the Vivosun app?
A : Yes, you can use your GrowHub controller offline or without the Vivosun app to control basic functions for LED lights, circulation fans, and duct fans. However, after connecting your GrowHub to Wi-Fi, you can use the Vivosun app to monitor your grow environment remotely in real-time and access additional features such as grow plans, historical data, and more.
Q: How is the controller powered?
A : The Vivosun GrowHub Controller is powered through the control cable (RJ45 or Type-C) connected to an AeroLight, AeroZesh, or AeroWave E6. No additional power cable is required. However, when connected to a VS series light like LumaLight, LumaRay, or other compatible lights, a power adapter is necessary to power the GrowHub Controller.
Q: Why can’t my VS1000 light be controlled by the GrowHub after connecting?
A : Please ensure your VS1000 or other VS series lights are connected to the RJ11 port on the Converter (Type C to RJ11 & RJ45) using a standard RJ11 cable, and set the dimming knob on your VS light to “EXT.” If you daisy-chain multiple VS lights, all must have their dimming knobs set to “EXT.”
Q: What kind of Wi-Fi router do I need? Is the Vivosun GrowHub compatible with 5 GHz Wi-Fi networks?
A : The Vivosun GrowHub connects only to 2.4 GHz Wi-Fi networks. Most routers broadcast both 2.4GHz and 5 GHz networks—often with similar names differentiated by “2.4 GHz” or “5 GHz.” Please select the 2.4 GHz network when pairing your GrowHub.
Q: My GrowHub Controller won’t connect to Wi-Fi during pairing. What should I do?
A : First, ensure your Wi-Fi network is 2.4 GHz, as the Vivosun GrowHub connects only to 2.4 GHz networks. Next, verify that the Wi-Fi password is entered correctly. If you still cannot complete the pairing process, please contact our support team via email and provide the login email you use for the Vivosun app so we can offer a tailored solution.
Q: What happens if my GrowHub Controller is offline?
A : If your GrowHub Controller is offline (no Wi-Fi or internet access), it will continue operating using the last programmed settings or Grow Recipe. You can control the GrowHub directly on the device, but live data and remote control via the Vivosun app will be unavailable. The GrowHub will automatically reconnect once Wi-Fi is restored.
Q: What happens if there’s a power outage? Do I need to reconfigure the controller?
A : If your GrowHub Controller was connected to Wi-Fi and the Vivosun app before the power outage, it will automatically reconnect to your Wi-Fi and continue executing your settings as if power had never been lost. If your GrowHub was not connected to Wi-Fi and the Vivosun app before the outage, you will need to calibrate the time on the controller first. The controller will then resume running the previous settings automatically.
Q: Can I reconfigure the Wi-Fi connection of the controller?
A : Yes. First, reset the GrowHub Controller E42A+ in System Settings. Then reconfigure the Wi-Fi connection using the Vivosun app.
Q: Why is the data shown on my app dashboard different from the data shown onthe GrowHub screen?
A : The live data updates every minute. You can also swipe down on the page to refresh the data manually.
Q: Can I temporarily override the settings while a recipe is running?
A : Yes. You can temporarily override a recipe by switching to Manual mode on either the Vivosun app or the GrowHub controller. To override in the app, stop the current recipe (Plan mode) before switching to Manual mode. On the GrowHub controller, you’ll need to unlock Recipe mode first before overriding.
Q: Does the Vivosun app work with iPhone and Android devices? What about tablets?
A : The Vivosun app is compatible with both iPhone and Android devices, including tablets. You can download the app from the Apple App Store for iOS devices (iPhone or iPad) or from Google Play for Android devices.
Q: Will the app notify me if there is an issue?
A : Yes. The Vivosun app will send notifications to your phone if devices encounter issues or if environmental conditions fall outside the set ranges.
Q: Can I use the App if I am outside of the United States?
A : Yes. The Vivosun app connects to your GrowHub controller via the cloud, allowing you to monitor and control your devices from anywhere in the world with an internet connection.
Q: How old is the data I can access in the Vivosun app?
A : The Vivosun app will display historical data up to one year old.
Q: Are you planning to add new features? If so, will I be able to benefit from them?
A : To ensure our customers love what they grow, our team constantly improves the product based on customer feedback (please check our community forum). All customers benefit from these improvements through free app updates or OTA (Over-The-Air) firmware updates.
When we release new features, we communicate them to our entire community—so don’t worry, you won’t miss out.
Q: How can I get technical assistance?
A : If you have any issues or questions, please contact us:
Website: https://vivosun.com/help/contact-us
Email: official@vivosun.com
Phone: +1-888-505-8486 (Monday to Friday, 7 AM–6 PM PST)
Address: Vivosun Inc.
1320 S Baker Ave Suite B, Ontario, CA 91761, USA
Warranty
Vivosun offers a two-year warranty on the GrowHub Controller E42A+ purchased directly from us or through our authorized dealers. This warranty reflects our commitment to addressing any manufacturing defects or premature failures that may occur under normal use.
The warranty covers replacement or refund for products that exhibit material defects within two years of the original purchase date. To initiate a claim, customers must provide proof of purchase to verify eligibility.
Please note that this warranty does not cover products that have been misused, abused, or intentionally damaged. It also excludes normal wear and tear or cosmetic imperfections such as minor scratches.
Our products undergo strict quality control and testing, and this warranty is a testament to our confidence in their durability and performance.
FCC ID Statement
This device complies with part 15 of the FCC Rules. Operation is subject to the following two conditions:
(1) This device may not cause harmful interference, and (2) this device must accept any interference received, including interference that may cause undesired operation.
NOTE: This equipment has been tested and found to comply with the limits for a Class B digital device, pursuant to part 15 of the FCC Rules. These limits are designed to provide reasonable protection against harmful interference in a residential installation. This equipment generates, uses and can radiate radio frequency energy and, if not installed and used in accordance with the instructions, may cause harmful interference to radio communications. However, there is no guarantee that interference will not occur in a particular installation. If this equipment does cause harmful interference to radio or television reception, which can be determined by turning the equipment off and on, the user is encouraged to try to correct the interference by one or more of the following measures:
— Reorient or relocate the receiving antenna.
— Increase the separation between the equipment and receiver.
— Connect the equipment into an outlet on a circuit di erent from that to which the receiver is connected.
— Consult the dealer or an experienced radio/TV technician for help
Warning: Changes or modifications not expressly approved by the party responsible for compliance could void the user’s authority to operate the equipment.
IC Statement
This device contains licence-exempt transmitter(s)/receiver(s) that comply with Innovation, Science and Economic Development Canada’s licence-exempt RSS(s). Operation is subject to the following two conditions:
-
This device may not cause interference.
-
This device must accept any interference, including interference that may cause undesired operation of the device.
The distance between the user and device should be no less than 20 cm.
CE Statement

We declare that this device is in compliance with the essential requirements and other relevant provisions of Directive 2014/53/EU.
| Product | Model | SKU |
|---|---|---|
GrowHub Smart Controller E42A+ |
GrowHub E42A+ |
GH-E42AP |
Wi-Fi: Operation Frequency: 2412MHz~2484MHz
Maximum Power: 20.5dBm(E.I.R.P.)
Operating temperature: 0 °C to +50°C
Address of Manufacturer: VIVOSUN INC, 2050 S LYNX AVE ONTARIO, CA 91761-8010
Contents

We help you grow your best green.

We provide the highest quality.

We relentlessly pursue the future.

We make growing more enjoyable.

We support every grower.
Sign up and get 8% off your first order
©2026 Vivosun All Rights Reserved